Tutorial 2- User interface
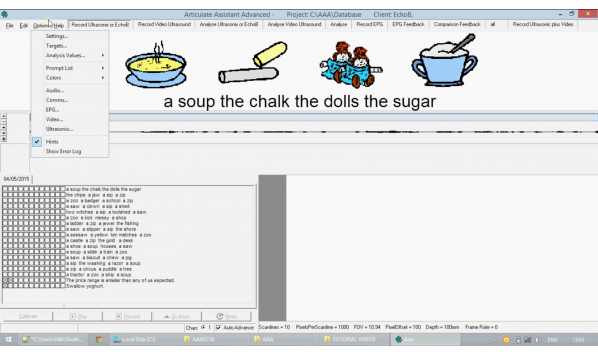
您的浏览器不支持 HTML5 视频。 And welcome to tutorial too.Basic user interface,Today,I will show you the basics of the UI.When you first start up the software,You will get this loading screen,Just wait while it loads and it will take you into the main window of the software.When you first start,The window should look something like this for the purposes of this tutorial,We'll have a demo file loaded.Depending on your screen resolution,You may need to resize the window to ensure that all elements are visible.Let's load in the data now.To begin with,The software has a number of tabs.Each allowing you to work on a different type of data or process to the left,You can import and export projects and their data,Create new projects and view the clients of existing projects.Edit gives access to functions which will be covered in later tutorials,As those options,Many of the headings here open settings and windows,Which allow you to configure specific methods for analyzing and manipulating the different types of data.These settings will be covered in the later corresponding tutorials.Under help you can find the full documentation license and registration.Let's just load in that data set now.Today,We're going to be using dataset Echo B,Which includes Ultrasonix data.To bring up the display,I will be clicking this little check box here.As it does not yet update the ultrasonix display,I will describe what these elements do momentarily.Let's begin with the current tab,Which is for ultrasonix and Echo B data.It is divided into four main sections in the bottom left is an interactive display of the prompts for the current project,The data for which can be accessed by clicking on their check boxes.Each check box corresponds to a data entry for that prompt.Each set of data can be identified by its date,Which you can see when you hover the mouse over it.Recordings taken on different dates are filed in corresponding tabs above.The currently selected prompt is always displayed at the top of the scr
收录时间:2020-02-12T07:29:58Z
使用资料正文
And welcome to tutorial too.Basic user interface,Today,I will show you the basics of the UI.When you first start up the software,You will get this loading screen,Just wait while it loads and it will take you into the main window of the software.When you first start,The window should look something like this for the purposes of this tutorial,We'll have a demo file loaded.Depending on your screen resolution,You may need to resize the window to ensure that all elements are visible.Let's load in the data now.To begin with,The software has a number of tabs.Each allowing you to work on a different type of data or process to the left,You can import and export projects and their data,Create new projects and view the clients of existing projects.Edit gives access to functions which will be covered in later tutorials,As those options,Many of the headings here open settings and windows,Which allow you to configure specific methods for analyzing and manipulating the different types of data.These settings will be covered in the later corresponding tutorials.Under help you can find the full documentation license and registration.Let's just load in that data set now.Today,We're going to be using dataset Echo B,Which includes Ultrasonix data.To bring up the display,I will be clicking this little check box here.As it does not yet update the ultrasonix display,I will describe what these elements do momentarily.Let's begin with the current tab,Which is for ultrasonix and Echo B data.It is divided into four main sections in the bottom left is an interactive display of the prompts for the current project,The data for which can be accessed by clicking on their check boxes.Each check box corresponds to a data entry for that prompt.Each set of data can be identified by its date,Which you can see when you hover the mouse over it.Recordings taken on different dates are filed in corresponding tabs above.The currently selected prompt is always displayed at the top of the screen.This means that any time you make a recording for a prompt shown here,You know that it is being stored under the correct entry below.You can find formatting options under the right click menu.The lower right of the screen.Here.Displays that ultrasonix image corresponding to the most recently selected data.Or if an empty cell is selected and you have recording equipment connected,It will show a live display of the hardware is view.It is important to remember that if you do not have equipment connected and you select an empty cell or prompt,It will not update the ultrasonix display until you select data or connect recording equipment.You can find a variety of options regarding the ultrasonix image under the right click menu,Which will be discussed in later tutorials.Finally,The timeline stretches across the middle of the screen.You can click and drag in the lower half of the timeline to place the timeline cursor.You can use this to play the data from a specific location and update the ultrasonix display.The top part of the timeline here.I'll shows you the audio.You can click and drag along this display to select a portion of the timeline.You have options available under the right click menu for interacting with a selection.This includes the ability to zoom to the selection.The narrow timeline shown at the very top displays their data in its entirety.The small bracketing parts here can be dragged or the whole selection moved to change your view of the timeline.This does not affect any selections placed in the main timeline.As for the left of the timeline,You can find a series of buttons that allow you to vertically zoom and pan and also reset to normal view.Finally,At the very bottom of the screen,You can find a bar displaying a variety of information.The bottom left here displays the position of your cursor over the timeline.There are also important buttons for selecting your audio channel.The auto Advanced Check box,If ticked,Means that when a recording is finished,The software will automatically move on to the next prompt.Be advised that depending on your screen resolution,This bottom bar may be hidden,You can resize or maximize your screen to fix this.This concludes the tutorial on basic user interface.Further information can always be found in the documentation to find out about recording and analysing data.Please see subsequent tutorials.