Tutorial 3- Annotations and Splines
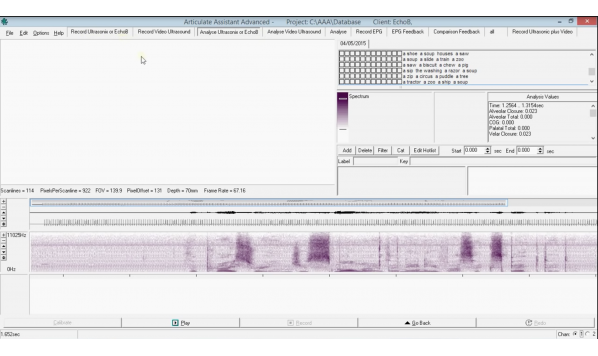
您的浏览器不支持 HTML5 视频。 And welcome to tutorial three.Today we will be looking at putting annotations on audio and putting spines on your ultrasonix images.So right now we are looking at the tab,Analyze Ultrasonix or Echo B.We had selected the data previously in the record Ultrasonixs ,Or Echo B tab.We are using the same demo data in this tutorial as we used in the previous.Currently,In this tab we are looking at the audio.We have given a spectrogram here,and we can check if we are unsure as to which audio channel is correct by using the radio buttons in the bottom bar.We can see that channel two is filled with noiseSo we want to use Channel one,As was correctly selected before.To put an annotation on your audio,You can select the part of the audio that you wish to annotate by clicking and dragging on the upper part of the timeline.The right click menu then shows up the options to allow you to add an annotation.This then places the marker on the upper timeline to indicate that that part is annotated.You can zoom similarly to the other tap.Just so it's easier to work with the data.When you were finished annotating,You can then go back to the recording tab and you can see that the annotations are now on the timeline.There.We will now look at what a fully annotated audio track looks like.This is one I have made earlier.If we look at it in the analyzed tab.We can see.How easy it is to place for names next to each other.The annotations.And then when you are looking at the corresponding images on the ultrasonix image.You can see how they correspond to the splines,So to move onto splines now.Let us return to the recording tab.If during operation of the software,You find that the image for the ultrasonix free sizes itself,You have options for changing its size in the right click menu.So if we move over to the other data here,We can try putting our own splines on.This data file is for the swallowing of some yogurt.To begin with editing splines,You can go into the right click menu
收录时间:2020-02-13T01:36:00Z
使用资料正文
And welcome to tutorial three.Today we will be looking at putting annotations on audio and putting spines on your ultrasonix images.So right now we are looking at the tab,Analyze Ultrasonix or Echo B.We had selected the data previously in the record Ultrasonixs ,Or Echo B tab.We are using the same demo data in this tutorial as we used in the previous.Currently,In this tab we are looking at the audio.We have given a spectrogram here,and we can check if we are unsure as to which audio channel is correct by using the radio buttons in the bottom bar.We can see that channel two is filled with noiseSo we want to use Channel one,As was correctly selected before.To put an annotation on your audio,You can select the part of the audio that you wish to annotate by clicking and dragging on the upper part of the timeline.The right click menu then shows up the options to allow you to add an annotation.This then places the marker on the upper timeline to indicate that that part is annotated.You can zoom similarly to the other tap.Just so it's easier to work with the data.When you were finished annotating,You can then go back to the recording tab and you can see that the annotations are now on the timeline.There.We will now look at what a fully annotated audio track looks like.This is one I have made earlier.If we look at it in the analyzed tab.We can see.How easy it is to place for names next to each other.The annotations.And then when you are looking at the corresponding images on the ultrasonix image.You can see how they correspond to the splines,So to move onto splines now.Let us return to the recording tab.If during operation of the software,You find that the image for the ultrasonix free sizes itself,You have options for changing its size in the right click menu.So if we move over to the other data here,We can try putting our own splines on.This data file is for the swallowing of some yogurt.To begin with editing splines,You can go into the right click menu for the Ultrasonix image and go to edit splines.This will bring up a dialog box.The only options you have at present in either tab is to create a new spline.You are given options here.Advanced users can select this one specific to their purpose,But for here and for most users,The one highlighted by a tick in fans' blind tongue.Roof men is the one that should be chosen.This taps blinds can now be used to format your splines.If we go to the key frames tab,Then we are given a list of the current key frames.It has automatically created a single frame at the cursor,Which in this case,Is the far left of the timeline at zero.In order to create further key frames,We can select the region that we want.On the timeline,And then we can go and choose one of the key frame,Adding options.The nth video frame option will place a key frame at every single frame if set to one and,For example,If set to two,It would be every alternating frame.If you wish to do use time as your measurement,You can select every n milliseconds.We will use every nth video frame,So now that we have selected all of the data on the timeline,We can now add,And it will fill in corresponding key frames for the whole data.Now,If we return to the very first one.We can edit.The properties of the contour we will start with the roof.While this dialogue is open,You can freely draw on the ultrasonix image with the mouse and in doing so,Change the contour of the selected spline.The roof contour will define the upper boundary for when we are in future.Using the automatic tracking fitting for the tongue.Boundary min tongue is similar at the lower boundary.What we can now do is when we draw on the contour for the tongue.We can then use some options available to allow us to better fit the contours of the shape of the tongue.One such option is snap to fit.What this does is it finds the nearest edge that it can as a place where there is a sudden change between dark and light pixels.This brings me on to an important point to help you fit the best.Explain to your image.If you go into the options of ultrasonix set up,This gives you the power to change the contrast and the brightness of your ultrasonic image.This because the software for fitting the spline to the image works from the image displayed to you and not the raw data,It is important that you change the brightness and the contrast to one that gives the most obvious shape of the tongue.So now that we have done this,We can and we have made our initial tongue,Ah,Contour.We can then select every frame that we wish to track across and pressed the track button.If you watch the ultrasonix image here,You can see the software,Calculating each subsequent frame and moving the contour of the spline to try and best fit the shape of the tongue.In this example,There are changes quite subtle,But I will show you one I made earlier,In which the change is very obvious.If at any point you wish to stop the track,You can use the stop button.Let's look at the one that I made earlier.That is using the previous data from the last tutorial.If we look along the timeline here,You can see the red line of the tongue spline.Following the outline of the Sonix boundary with the tongue.You can also see how it corresponds to the annotations above.This concludes the tutorial for editing annotations and editing splines.Further help is always available in the documentation.If you want to learn about recording your own data,Please see subsequent tutorials.