Tutorial 9- Batch Processing Splines
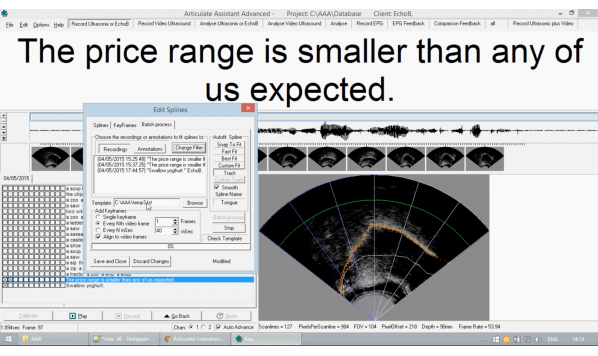
您的浏览器不支持 HTML5 视频。 And welcome to tutorial nine Batch Processing of splines.If you have not yet seen the tutorial on splines and other spline editing,Please see previous tutorial on it.So today we are going to set up splines for batch processing.As usual.We can go into the Edit splines dialogue to bring up,And similarly to how it is shown in the previous tutorial,We will go through that process.We will use the defaults which gives us these splines.Here we can go to key frames,Select the first of which.I set up the min or the roof first,It's probably fine where it is.Set up the min tongue.The layout of this tutorial will follow a slightly unconventional format because the software regarding batch processing of spline is relatively new.I will have to explain some things which you must do to ensure that your data is correctly batch processed.So now that we have set up that one,We can go to the tongue.Best fit it.And wait, there we go.We will just do a manual correction here.So now that we have done this,We can return to splines.Click the advanced button.And then this gives us this template tab at the top,Which is a new addition in the latest version of Articulate Assistant Advanced.These two buttons correspond to saving only the currently selected fan spline and all of them,As we have just set them up,We will use all we can give it a title.Which then saves it here,Click OK.And now if we go to the new batch processing tab.We can choose.To use are.Template that we have set up.All templates that you save using the splines advanced are saved into the AAA directory,And so you can browse for them or type in their file path here,The settings which you can find are very similar to those as they appear in key frames,With these two sections being exactly the same.Their function is slightly different in batch,So,For example,The best fit button if it were used with the batch processing would mean that for each video frame or ultrasonix frame,It would then apply a Best fit,Whereas
收录时间:2020-02-13T11:23:28Z
使用资料正文
And welcome to tutorial nine Batch Processing of splines.If you have not yet seen the tutorial on splines and other spline editing,Please see previous tutorial on it.So today we are going to set up splines for batch processing.As usual.We can go into the Edit splines dialogue to bring up,And similarly to how it is shown in the previous tutorial,We will go through that process.We will use the defaults which gives us these splines.Here we can go to key frames,Select the first of which.I set up the min or the roof first,It's probably fine where it is.Set up the min tongue.The layout of this tutorial will follow a slightly unconventional format because the software regarding batch processing of spline is relatively new.I will have to explain some things which you must do to ensure that your data is correctly batch processed.So now that we have set up that one,We can go to the tongue.Best fit it.And wait, there we go.We will just do a manual correction here.So now that we have done this,We can return to splines.Click the advanced button.And then this gives us this template tab at the top,Which is a new addition in the latest version of Articulate Assistant Advanced.These two buttons correspond to saving only the currently selected fan spline and all of them,As we have just set them up,We will use all we can give it a title.Which then saves it here,Click OK.And now if we go to the new batch processing tab.We can choose.To use are.Template that we have set up.All templates that you save using the splines advanced are saved into the AAA directory,And so you can browse for them or type in their file path here,The settings which you can find are very similar to those as they appear in key frames,With these two sections being exactly the same.Their function is slightly different in batch,So,For example,The best fit button if it were used with the batch processing would mean that for each video frame or ultrasonix frame,It would then apply a Best fit,Whereas track what it would do would be that it would apply a best fit to the first frame and then Snap to fit to the previous frame for each frame similar to the normal track function.If you are using a very large amount of data,It is recommended to not use Best fit as the time it would take to process would be extremely large.In such circumstances,Fast fit may be unacceptable Approximation.Similarly,Snap to fit.As being similar to best fit when used with batch will not snap to fit to the previous frame as track does,But will snap to fit to your template for each frame.For all data.So they recommended settings which most users should use unless they have good reason otherwise is to use every nth video frame set to one and to use track.The smooth checkbox should always be checked to ensure that the resulting splines have a nice curve to them and are not jagged in appearance.When this is done,You can select which recordings and clients you would like to have the batch process apply to the change filter tab is available,Which is the same filter as discussed in previous tutorials.One very very important thing to remember at this pointis that the batch process will generate an error and cease to run if you include in the list of batch processed recordings,Any which do not contain ultrasonix Echo B or video data.So,For example,If I were to include a recording from the W,S client which is available in the demo version of AAA,That client does not have associated ultrasonix or Echo B data as such,If any of the recordings were present in this list,Batch process would not function properly.So the filters that I have used art should go with the current client,Which means that because in the case of the demo file here,I know that the client has only ultrasonix and Echo B data.I can safely say Filter by that.So now that this is done,We can click batch process,And this will take a considerable amount of time,Including setting it up before it even begins to run.Batch process is different to other functions of supplying editing and that it will always save during every single frame.As a result,You must ensure that if you have data already present regarding splines that this will overwrite it or create the data on top.For the more,Subsequent batch processes,Which are run without deleting old batch process data results,Will cause many iterations of batch process data to be recorded over the top of one another,Resulting in several overlapping splines,Which can be very difficult to identify and to determine which are the necessary ones delete as such,I highly highly recommend that before you run any batch process,You delete all existing splines for the all clients,For which you wish to run the batch process.If you wish to stop a batch process,You can press the stop button which will safely abort the procedure and ensure that the data of which has so far been generated in the batch process will be saved as such,Because the saving happens automatically with each frame discard changes will not remove any new additions to the splines generated using the batch process.So if we wish to run another batch process,Having decided that we did not like the result of our present batch process,We can return to the edit splines dialogue.Enter the spline tab,We can delete all of our splines that were generated a batch process by repeatedly hitting the delete button.This will then ensure that there are no splines in place to interfere with a new batch process.This concludes batch processing tutorial.If you would like to know more about fitting splines to your data,Please see the previous tutorial on splines.