Tutorial 4- Exporting data
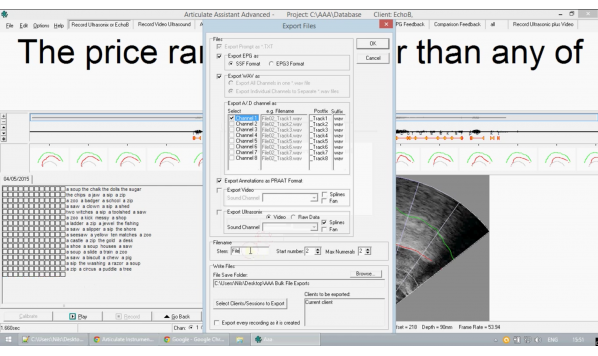
您的浏览器不支持 HTML5 视频。 And welcome to tutorial four.Today we are going to look at how to export data in the two main ways.We will be using today the same data set as we had used in the previous tutorials.Both forms of exporting data that I will talk about today can be found under file in the top bar and export.The first we will look at is export files.This is a powerful tool to allow you to export your data in bulk from all your clients and recordings at once for import into other software.Check boxes along the left side allow you to choose what sort of data you would like to export.If we have export is grayed out,Just uncheck and recheck the box.Exporting all channels in one file will merge it into one channel.So,for example,Stereo sound would become mono,If you only have data in one channel and you must check the box to export it.Video data,I should remind is different from ultrasonix data.You can export both along with any spines or fans you have added.The second last step is to go to select clients and sessions to export.This is a vital step of the data exporting process.In this dialog,You can select which of your clients you want to export the data of you can select as many as you want.It will select Echo B.Once you have chosen,You can use the tabs to specify further which recordings you want to export.The final step is to choose the name of the generated files and how you would like them to be successively numbered.The first name can be specified here.And the second part of the name can be specified for each particular channel.Be warned,This method of data export may create a lot of files,So I advised that you make an empty folder when you are ready,You can then click OK.The second main method of exporting data is in the tool export data.Found also under file.This is mainly used for exporting tab delimited data for statistics Packages and spreadsheets.While with the previous too,You chose data by its type in the export data tool,You filter the data by its content.
收录时间:2020-02-12T11:31:12Z
使用资料正文
And welcome to tutorial four.Today we are going to look at how to export data in the two main ways.We will be using today the same data set as we had used in the previous tutorials.Both forms of exporting data that I will talk about today can be found under file in the top bar and export.The first we will look at is export files.This is a powerful tool to allow you to export your data in bulk from all your clients and recordings at once for import into other software.Check boxes along the left side allow you to choose what sort of data you would like to export.If we have export is grayed out,Just uncheck and recheck the box.Exporting all channels in one file will merge it into one channel.So,for example,Stereo sound would become mono,If you only have data in one channel and you must check the box to export it.Video data,I should remind is different from ultrasonix data.You can export both along with any spines or fans you have added.The second last step is to go to select clients and sessions to export.This is a vital step of the data exporting process.In this dialog,You can select which of your clients you want to export the data of you can select as many as you want.It will select Echo B.Once you have chosen,You can use the tabs to specify further which recordings you want to export.The final step is to choose the name of the generated files and how you would like them to be successively numbered.The first name can be specified here.And the second part of the name can be specified for each particular channel.Be warned,This method of data export may create a lot of files,So I advised that you make an empty folder when you are ready,You can then click OK.The second main method of exporting data is in the tool export data.Found also under file.This is mainly used for exporting tab delimited data for statistics Packages and spreadsheets.While with the previous too,You chose data by its type in the export data tool,You filter the data by its content.The first screen you see presents three options.You can hover over with the mouse for hints on each.The first option is to export a tab delimited file of the selected data.The second option calculates a diagram,Showing what percentage of the selected time each contact is touched in EPG.The third option is to export the data to the spline workspace,Which will be discussed in subsequent tutorials.For all of these functions,You can use the powerful filter tool which can be found under change filter in the filter tab.The filter gives you a range of options for specifying the data you want to export.You can type in strings and you can specify ranges to narrow the data to that which meets your criteria.So,for example,If we want to export data only associated with an r phoneme.We can go to filter on annotation and type in that which corresponds to an R.So then,When we press OK,We can see that in the track it has shown that only the R Phonemes are now selected.When we then look at the annotation selected,We can also see them in this list.You can see what felt as you have applied in this tab in the filter tab.In the tap columns,You can also choose what data would be added to a tab delimited file.You can add in new entries here and choose from the buttons to select what sort you would like to add.Finally,The rows Tab allows you to choose whether you would like to add a summary to the date of the UI are exporting.You can choose what goes in the summary with these check boxes,And when you are ready,You can press execute.This concludes how to export data for information on supplying workspace and EPG please see subsequent tutorials.