Tutorial 5- The Spline Workspace
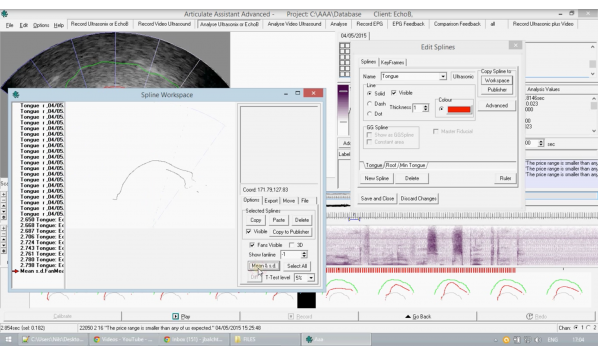
您的浏览器不支持 HTML5 视频。 Hi.This is tutorial five today we will be looking at the spline workspace.The spline workspace is a tool available in the software to allow you to manipulate splines you have placed and prepare them for publishing in scientific documents.The spline workspace is not available from the tabs at the top to open it,You have to right click the ultrasonic or video image,and click spline workspace.At the moment we can see that the workspace is empty.We need to choose some splines to look at to do this.There are two main methods.The first uses the export data function discussed in the previous tutorial.If we choose export displaying workspace,Make sure that our Filter are selected.In our case,We are selecting simply for the R semi vows and go into spline and check the tongue.This will then export to the workspace which are filled in now here.The process of exporting to the workspace takes time,No matter what method you use,So please be patient and try and limit the amount of data you put in at any time.The second way to put data into this spline workspace is to select it from the track and use the edit spline too.If you remember,You can open the edit spline from the right click menu on the ultrasound or video.This brings up the editing splines dialog.You can select spline on the lefthand menu,Or you can click and drag within the track to select an area.For the purpose of drill,We will select the sibilant sound here.If you then go into the spline tab in edit spline,You can then click copy to workspace.Although the window is slightly off the edge here,It is loading in these splines and you can see that they have been given a slightly different name because they have been brought in from the slightly different method.Within the spline workspace,There are four tabs under the options tab are a number of things that can be done.If we select the spline that were initially got from the export data method,We have the option mean and standard deviation,Which if we c
收录时间:2020-02-13T03:54:19Z
使用资料正文
Hi.This is tutorial five today we will be looking at the spline workspace.The spline workspace is a tool available in the software to allow you to manipulate splines you have placed and prepare them for publishing in scientific documents.The spline workspace is not available from the tabs at the top to open it,You have to right click the ultrasonic or video image,and click spline workspace.At the moment we can see that the workspace is empty.We need to choose some splines to look at to do this.There are two main methods.The first uses the export data function discussed in the previous tutorial.If we choose export displaying workspace,Make sure that our Filter are selected.In our case,We are selecting simply for the R semi vows and go into spline and check the tongue.This will then export to the workspace which are filled in now here.The process of exporting to the workspace takes time,No matter what method you use,So please be patient and try and limit the amount of data you put in at any time.The second way to put data into this spline workspace is to select it from the track and use the edit spline too.If you remember,You can open the edit spline from the right click menu on the ultrasound or video.This brings up the editing splines dialog.You can select spline on the lefthand menu,Or you can click and drag within the track to select an area.For the purpose of drill,We will select the sibilant sound here.If you then go into the spline tab in edit spline,You can then click copy to workspace.Although the window is slightly off the edge here,It is loading in these splines and you can see that they have been given a slightly different name because they have been brought in from the slightly different method.Within the spline workspace,There are four tabs under the options tab are a number of things that can be done.If we select the spline that were initially got from the export data method,We have the option mean and standard deviation,Which if we click it,Will calculate a mean and standard deviation across all of those selected splines,We can use the visible check box to make the spline invisible,So we can now see are mean and standard deviations.Plane.Well,Now,Just create a mean and standard deviation for the other data.So if we want to can Check what each of these two means and standard deviations are like against each other,We can use the difference function.To do this.We have to select both of the means and pressed difference.In doing so.It creates this,Which shows how much each is different from the other.The way that you tell which way round they are is that, the first one that you selected is the one which is then shown as being different from the second,Which is used as the control.So then,If we want to export this,The button copy to publisher will open.It.In publisher,Publisher will be discussed in subsequent tutorials.The 3D function creates a 3D image.You can click and drag to move it around more data you put in this,The more slow it will be to move around,As it will have to refresh the data each time you click.The export tab allows you to export this blinds that you have created to a file you can choose,Whether that they use a Cartesian coordinates or polar.If we click on the difference found distance,This display at the top also shows us some information about the difference that has been calculated.The P value in the right hand column is as calculated from the T test level on the options tab.Whichever type of supply new click,That box will always show you information about it.In the move tab,You can choose,this spline that you want to move,And then you can actually move it within the workspace.The mirror function allows you to mirror it,As is in perhaps the case that you had got the dental and the rear of the mouth mixed up,The reset button resets its position to before you had edited it.This concludes the spline workspace tutorial.If you want to learn more about publisher,You can see subsequent tutorials and if you would like to learn more about placing splines on your data,See previous tutorials.